What Can I Put in Cavit to Make It Moist Again
Cavity Wall Damp and how to Diagnose Cavity Clammy Issues and Prepare Them
Find out how to diagnose and gear up damp problems in your cavity walls and what problems these could be causing in your domicile.
One of the best means of preventing damp travelling through the walls of a property and affecting the internal surface of the facing walls within your house is to build with a cavity however in some cases this itself tin can actually cause cavity wall damp issues.
Below is a listing of means a crenel tin be compromised and allow damp through to the within every bit well as a suggested fix for each consequence.
If you would like some boosted expert advice delight call Holding Repair Systems on 01626 872 650, gratis of charge and no obligations involved.
Testing for Potential Damp Issues
Initially information technology is a skilful idea to firstly institute if you do indeed have crenel wall damp. There are two different means of checking this:
- Back of Hand – You can utilise the back of your manus and feel for damp, obviously not the nearly authentic of measurements just tin can in serious damp cases indicate issues with little, if whatever, initial expense.
- Damp Meter – For a more accurate measurement you lot can purchase what'south chosen a damp meter. There are two unlike types of damp meter, a Relative Humidity Meter or Hygrometer (these measure the amount of moisture in the air within a room space) and a Clammy Testing Meter (these tin be used to test the damp within actual materials such as plaster, timber or brick). NOTE: a Damp Meter volition give you an indication of damp percentage, if any, and a expert ground to plant whatsoever damp bug you may have but for an authentic reading laboratory testing is required. Damp Meters can be purchased from many of the DIY stores but the two examples below we purchased from Property Repair Systems
Damp Testing Meter

Relative Humidity Hygrometer
DPC Covered past External Basis
Issue: DPC Covered by External Ground – The original clammy proof course added when the property was constructed could possibly be bridged or covered. A damp proof course has to be a minimum of 6 inches or 150mm above the ground. This means in essence that on the exterior of your property at that place perhaps a section of high footing (sloping ground or a garden) or a newly congenital structure that is now butting up to your holding e.thousand. a prepare of steps or a conservatory/outbuilding, that is at present bridging the gap above and beneath the original clammy proof course and providing any damp or moisture a direct route around the damp proof form and upwardly into the external wall.
In the majority of cases a decent, clear cavity should stop whatever cavity wall damp or moisture penetrating into the inside wall just in the odd instance, the moisture tin can travel upwardly the wall and see a connecting medium such as a wall tie and gain access to the inside wall.
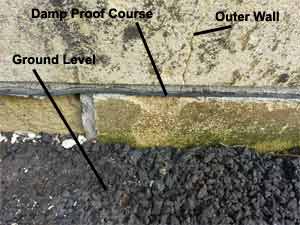
Good Instance of Clear Damp Proof Course
Fix – To cure this outcome yous substantially have several options. The ideal set is to clear the bridging structure e.g. dig back the garden and go out a gap between it and the external wall exposing the damp proof course, remove the sloping basis or remove the conservatory or adjoining structure. In the instance of the latter ii items (solarium or joining structure) this may not exist possible, specially if yous accept just spent £20,000 on building the conservatory. If this is the case then this is quite a sizeable mistake on the builders part.
In the case that you are unable to clear the obstruction the all-time and easiest set is to add together a new damp proof course. In that location are quite a few products on the market today that enable you to DIY information technology quite chop-chop and easily such equally Permagard or Twistfix. One that we take used on several occasions and found to requite great results is UltraCure DPC Cream find out more about it here. Find out more than nigh Damp Proof Injection and Damp Proof Courses in our DIY project.
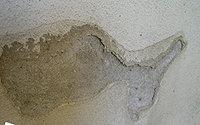
Bridged Crenel or Filled with Rubbish
Event: Bridged Cavity or Filled with Rubbish – The cavity void itself has been filled with rubbish and debris such equally broken pieces of brick, mortar spillage or sand that has been dropped during the construction stage. As nosotros know, the main point of the crenel is to keep water and moisture abroad from the inner walls of a holding. Any water or wet that penetrates the outer wall, runs downward the inside of the outer wall, hits the Damp Proof Form and and so runs back out. The introduction of debris to the void so blocks the channels used by the moisture to leave and also gives it a direct route to the inner wall, creating cavity wall clammy.

Worst Case Scenario – Poor Crenel void
Ready – As you may have already guessed, the only way to fix this is to clean the cavity out. To do this yous will need to remove ane or possibly 2 bricks at floor level or equally close to floor level as possible. (Note: practise non remove anymore than 2 bricks at a time. If you need to remove more than than 2 bricks please consult with a surveyor or reliable builder). This may sound similar a flake of a daunting job just it'south quite easy (see our Replacing a Damaged Brick projection for more than information). Once you lot have removed your brick(south) y'all can and then apply a camera or mobile phone with a light to view the cavity to found information technology's status.
From this you should be able to run into its condition and any rubbish that may be there. You tin remove the rubbish by hand (habiliment some sturdy gloves as there may exist sharp objects in in that location) and where debris is out of reach, use a bar or scraping device to elevate it dorsum. For a fine clean, use an old vacuum cleaner to suck up whatsoever smaller objects. Once done you tin now replace your bricks.
Wall Ties Dirty or Corroded
Consequence: Dirty or Rusty Wall Ties – Some other style that damp and marks can announced on inner walls and affect the surface is due to the wall ties that are used to necktie walls together. In some situations wall ties can become dirty, ordinarily mortar sitting on them created at the fourth dimension of construction, or possibly condensation allowed to collect on them due to gaps in mortar, leaking roof, gaps around window sills etc…. that allows moisture and cold air to enter the cavity (which is technically known as Interstitial Condensation) and collect on the tie and create a "cold bridge". This causes a difference in temperature around the afflicted area on the inner wall and create a cold spot. The cold spot then allows moisture to condense much more than easily than in the surrounding areas. This usually appears in the form of damp or mould.
In some cases wall ties can get rusty and corroded (over again usually due to long term exposure to moisture from gaps or leaks). The human activity of rusting and then in virtually cases creates its own gap that in turn allows moisture and cold air to penetrate the cavity and produce a cold spot on the inner wall. This type of issue can usually be easily spotted as cracks can exist seen in the external mortar between the bricks or stones.
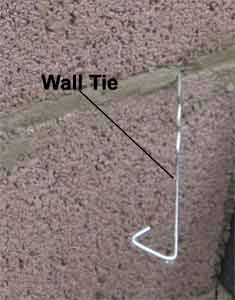
Wall Tie Positioned Between Mortar Joints in Internal Crenel Wall
Ready – Once more as with the gear up for a Bridged Cavity, you may have already guessed that the only way to properly diagnose and fix this issue is to remove a brick and possibly replace the wall tie itself. Firstly using a metal detector (these can be hired from your local rent store) locate the suspect wall tie on the outer wall, using the clammy on the inner wall as a reference to the rough area. Once the necktie's been located remove the brick that connects to the tie and audit the condition of the wall tie. If the necktie is dirty, make clean it properly. If it needs replacing then encounter our Checking Wall Ties DIY Projection.
Fixings, Wires and Pipes
Upshot: Fixings, Wires and Pipes inside the Cavity Void – In some properties in that location can be a great deal of service fixings, bolts, screws, wires and pipes that penetrate the inner cavity wall and sit inside the crenel void itself. This can cause crenel wall damp issues equally if there is an item poking into the void from the inner cavity wall then any damp, leakage or moisture and then has a straight route into the property and on to the inside wall surface.
As in some of the issues above this tin create cold spots on inner walls where common cold air from other gaps in the external wall (or the gap reverse if the detail in question spans both walls and exits the holding through the external wall) tin seep through any gaps around the fixing creating a cold spot and allowing condensation and mould to develop or in the case of air moisture or a leak dripping on to the fixing, pipe, wire etc…. itself, permit the moisture to run onto the inner crenel wall and possibly through whatsoever gaps around the fixing itself and directly onto the inside of the property.
Occasionally moisture can run downward a fixing then on down the within wall and appear as a damp problem elsewhere on the wall so be aware of this! It's also worth giving your property a good going over if y'all are experiencing moisture or clammy issues as it may be the case that it is non getting into your property exactly where you lot remember information technology is and your cavity wall clammy may be the sign of something much more serious such as a leaking roof!
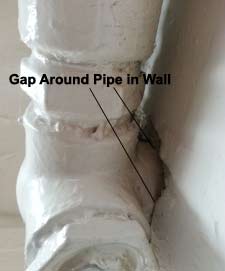
Obvious Gap Around Pipe in Internal Cavity Wall
Fix – The first pace is to remove the object (if possible) and properly seal up the remaining hole using the right material, either mortar or an air tight sealing compound. Make certain that any holes are sealed on both the inner and outer wall equally you don't desire further common cold air, moisture or clammy to go along to admission the cavity expanse and cause the cavity wall damp.
If it is not possible to remove the object and then make sure that whatever gaps around it are sealed tightly. In this instance it'south probably best to use a flexible filler as with heating pipes specially, they contract and expand depending on temperature and so a rigid filler tin can quickly fissure and autumn out creating the trouble once more.
Information technology may be as well be worth moving a brick from the external wall near to where the damp or mould etc…. is manifesting itself then inspecting with a camera, mobile phone or borescope to see if you tin can physically run into the source or the consequence.
Poor Cavity Insulation
Issue: Poor Cavity Insulation Job – The upshot here is really in the proper noun – some crenel insulation companies perform sub standard piece of work. They volition only function-fill the crenel (in some cases nosotros have known cavities to have only been filled 400mm upward from floor level as lets confront it, their work is going to be difficult to check, so how would you know!), filling holes are drilled too far autonomously creating gaps in the insulation and cold spots on inner walls around these gaps (commonly if the cavity gap is narrow and does not allow much insulation to exist pumped in), the cavity void was not inspected before insulating and is full of debris etc….
As y'all can run into from the to a higher place there is a potential minefield of bug that can arise from a poor cavity insulation job and then please, please do your enquiry earlier hand and select the right type of insulation (there are quite a few on the market at present – cream, polystyrene balls, rockwool etc….) and the right installer (bank check their credentials, previous jobs etc….). Beside the issues and if washed correctly, crenel insulation can be very effective and provide considerable savings on your heating bills.
Set up – Unfortunately there is no real magic cure for a poor insulation job. The only real thing that tin be done is to firstly check the task and found what the consequence is (gaps, non filled correctly etc….) by removing bricks and then potentially effort a re-injection of the insulation, though removal of the old insulation first may be necessary, if information technology is fifty-fifty possible. Before y'all go ahead and try this always consult with a reputable and professional insulation company, again exercise your research first!
Fixing Cavity Wall Damp Impairment on Internal Walls
In the result that your property is suffering from cavity wall clammy issues these can manifest themselves as several unlike issues on the footing floor walls of your property giving a adept indication of the potential issues that y'all are experiencing. Some of these issues and their potential fixes are outlined below:
Blowing Plaster and White Salts
Result: Plaster Blowing off Walls – This issue is most commonly caused by moisture or leakage and before you attempt to fix the blown plaster you have to become the source leak sorted Iif y'all don't it won't exist too long earlier the plaster starts to blow once more. Visually blown plaster is quite easy to spot equally you lot can come across any damp spots on wallpaper as it starts to flake off of the wall information technology'southward the same with paint. With bare plaster this is also similar equally you lot tin run into the plaster jutting, flaking and falling off the wall. A common indicator is also a white table salt-like substance effectually the afflicted expanse (efflorescence, hygroscopic salts).
Plaster Blowing off of Wall
Fix – Once you take fixed the leak at source and are sure that you are not going to feel whatever farther crenel wall damp issues, leave the expanse to dry correctly (how long this takes will depend on the materials used, bricks, blocks, type of plaster, humidity, temperature, whether at that place is crenel insulation present etc….). A dehumidifier may assistance hither.
If the plaster dries out and has not diddled and then you should be fine and it will not need replacing. You can and then go ahead and redecorate the area. If mould is present then you volition besides demand to care for with an anti-fungal or mould inhibitor to ensure no mould is allowed to grow again.
In the case that yous accept found a white salt-similar substance you will demand to remove everything from the damaged surface area (paint, wallpaper and plaster) downwards to the blank wall and replaster and redecorate from scratch. Before yous do then you will need to apply a Salt Neutraliser/Inhibitor (a clear liquid used to neutralise 'salts' in render, plaster or masonry. We utilize Property Repair Systems Salt Neutraliser. With the salt neutraliser now added (in accordance with manufacturers guidelines, allowing to dry every bit required) you tin replaster and redecorate.
Salt Neutraliser
Damp Patches (Walls and Chimney Chest)
Event: Clammy Patches – If you have damp patches actualization at a low level around the skirting surface area that appear to disappear and then reappear again the chances are that this is being acquired by Hygroscopic Salts. When these salts are present they tin attract wet from out of the air and crusade damp patches to announced and, as in the above Blowing Plaster event, can cause the plaster to blow off of the wall resulting in a fair amount of cost and hassle to put it correct.
If the damp is present constantly and appears college upwardly the wall then the nigh likely crusade is moisture/water entering the cavity wall of the property at some other location.
Accept you lot ever noticed a yellowy, brownish stain in the wallpaper around a chimney chest? If then and so this is prove of clammy or hygroscopic chimney salt, which as in the case of salt higher up, is attracting wet from the air and causing damp to announced. As it'southward around the chimney area, the act of called-for coal or wood and some of the minerals establish in some materials helps with the creation of the xanthous and brown staining and if the damp is coming from the chimney itself then this can also contribute.
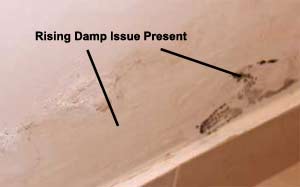
Rising Damp Evident Just Above Skirting Board
Fix – If you accept checked all the external walls of your property, the roof, any fixings, pipes or wires, cavity insulation bug and all are okay and then the issue may be the effect of Rising Damp caused by bridging of the damp proof course or it'southward failure. Establish if the DPC has been bridged and prepare if y'all can. If you are unable to or there is no bridging nowadays and so the introduction of a damp proof form may exist required. Equally commented above at that place are quite a few chemical DPC companies on the market offer products that can be applied chop-chop past the DIYer. We tend to use Quick Cream Ultracure DPC from Holding Repair Systems equally it's quick and piece of cake to install, produces no chemical smell, is British Lath of Agrèment approved and gives great results.
If the issue is non due to rising damp and the damp patches are appearing further up wall areas and then you have another crenel wall clammy event. Again, using all the information narrow down the issue then investigate and fix. Once fixed, permit the area to dry out completely and so you can redecorate
In the result that white Hygroscopic Salts are present you lot will demand to add together a table salt inhibitor to the surface before yous redecorate. If the plaster dries out okay and can be saved, add the inhibitor on acme of the plaster (following manufacturers guidelines, every bit to whether you can add together the inhibitor on top of the plaster) to prevent any further salt harm. If the plaster cannot be saved then it will all need to exist removed. Add together the salt inhibitor straight on to the wall so replaster over the top and and then redecorate
In the case of chimneys, this can exist a picayune trickier to diagnose, equally the leak may be coming from the roof (where the roof seals effectually the stack, cracks and impairment to lead flashing), from the crenel expanse, from moisture or humidity within the chimney due to a poorly capped chimney, broken stack, mortar damage to stack, broken chimney pot, poorly installed flue or liner etc… so these volition need all checking out commencement and fixing if required. Again, following the guidelines above, add salt inhibitor if required, supersede whatsoever damaged plaster and then redecorate
In very extreme situations the salt neutraliser itself may just not exist enough to cope with the amount of salts present. In this situation, yous may need to apply a membrane over the acme wall surface (with salt neutraliser applied) earlier yous then replaster (like to dry lining and looks like a dimpled plastic 'air gap', find out more near Mesh Membrane on the PRS website. In the past nosotros take used the Mesh Membrane from PRS and found it to remove any hereafter salts in one case plastered over.
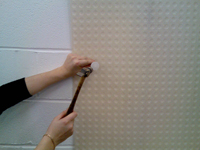
Mesh Membrane to Hold Back Common salt
DIY Doctor have worked closely with Belongings Repair Systems for a number of years and we have found their products to exist reliable and of a high standard. If you would like farther information or advice on on Crenel Wall Damp or other Clammy Issues you tin contact PRS on 01626 872 650 for additional, no obligation advice.
Source: https://www.diydoctor.org.uk/projects/dampcavity.htm
0 Response to "What Can I Put in Cavit to Make It Moist Again"
Post a Comment